
If you plan to perform a clean install of Windows Server 2022 (or an older version), you will need to create a USB bootable drive that you can use to start the server and continue with the setup. You can complete this task in at least two ways, and in this guide, you will learn how.
Unlike Windows 11 and 10, Microsoft doesn’t offer a Media Creation tool to download the ISO or create a USB flash drive to install the server version of the operating system. However, it’s possible to create a Windows Server bootable USB drive using commands or through third-party apps like Rufus.
This guide will teach you the steps to create a Windows Server USB flash.
- Create Windows Server 2022 bootable USB media with Rufus
- Create Windows Server 2022 bootable USB copying files to USB
Create Windows Server 2022 bootable USB media with Rufus
To create a Windows Server 2022 bootable USB with Rufus, use these steps:
-
Click the “Download the ISO” link.

-
Register with the form and download the ISO file.
-
Click the Download now button.

-
Click the “ISO downloads 64-bit edition” option to download the file.

-
Under the “Download” section, click the link to download the latest version.
-
Double-click the rufus.3.xx.exe file to launch the tool.
-
Under the “Device” section, select the USB flash drive to create the bootable media.
-
Under the “Boot selection” section, select the “Disk or ISO image” option.
-
Click the Select button.

-
Select the “Windows Server 2022 ISO” file.
-
Click the Open button.
-
Under the “Image option” setting, select the “Standard Windows Installation” option.
-
Under the “Partition scheme” section, select the GPT option.
-
Under the “Target system” section, select the UEFI (non-CSM) option.
-
Under the “Volume label” section, confirm a name for the USB flash drive. For example, “Server 2022 USB.”
-
Use the default settings for the File system and Cluster size options.
-
Check the Quick format option.
-
Check the “Create extended label and icon files” option.
-
Click the Start button.
-
Clear the “Customize Windows installation” settings.
-
Click the OK button.
-
Click the OK button again.
Once you complete the steps, you can proceed to install the server version of Windows on the device.
Create Windows Server 2022 bootable USB copying files to USB
To create a Windows Server 2022 bootable USB through Command Prompt, use these steps:
-
Open Start.
-
Search for Command Prompt, right-click the top result, and select the Run as Administrator option.
-
Type the following command to open DiskPart and press Enter:
diskpart
-
Type the following command to find out the USB flash drive and press Enter:
list disk
-
Type the following command to select the drive and press Enter:
select disk 2
In the command, replace “2” with the number of the USB removable drive.
-
Type the following commands to erase the flash drive and press Enter:
clean

-
Type the following command to create a primary partition on the drive and press Enter:
create partition primary
-
Type the following command to select the new partition and press Enter:
select partition 1
-
Type the following command to activate the partition and press Enter:
active
-
Type the following command to make the Windows Server 2022 USB flash drive bootable and press Enter:
format FS=FAT32 quick
-
Type the following command to set a drive letter and press Enter:
assign letter=S
In the command, change “S” for any available letter to use.

-
Type the following command to exit the DiskPart tool without closing Command Prompt and press Enter:
exit
-
Type the following command to mount the Windows Server 2022 ISO file and press Enter:
PowerShell Mount-DiskImage -ImagePath "E:\SERVER_EVAL_x64FRE_en-us.iso"

In the command, change the path with the location of the ISO file.
-
(Optional) Type the following command to start DiskPart and press Enter:
diskpart
-
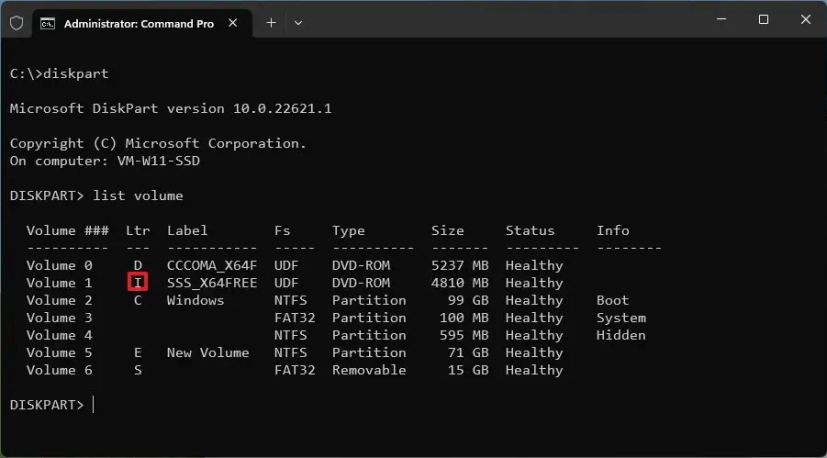
(Optional) Type the following command to find the drive letter for the mounted ISO file and press Enter:
list volume
-
Type the following command to quit the DiskPart tool and press Enter:
exit
-
Type the following command to access the Windows Server 2022 ISO file and press Enter:
I:
In the command, change “I” for the drive letter of the mounted ISO file.
-
Type the following command to enter the “boot” folder in the ISO file and press Enter:
cd boot
-
Type the following command to update the volume boot code on the flash drive and press Enter:
bootsect /nt60 S:
-
Type the following command to copy all the Windows Server 2022 files from the ISO to the USB flash drive and press Enter:
xcopy G:\*.* S:\ /E /F /H
In the command, change the “G” and “S” drive letters with the correct drive letters for the Windows Server 2022 ISO image and the USB drive respectively.
After you complete the steps, you can use the USB flash drive to perform an in-place upgrade or clean installation of Windows Server 2022.
These introductions should also work to create a USB bootable drive for previous versions of Windows Server, including 2019 and 2016.