
On Windows Server 2022 (or 2019 and 2016), you can assign a static IP address in at least two ways through the graphical user interface (GUI) or commands, and in this guide, you will learn how.
When planning to install the server version of Windows, configuring a static IP address is among one the first tasks you have to complete as it will make it easier to share files and printers, and you may need this configuration to set up other networking features like port forwarding. Otherwise, services can stop working at any time.
By default, the server and client version of Windows receives a dynamic network configuration from the Dynamic Host Configuration Protocol (DHCP) server, and since it’s “dynamic,” it can change at any time. If this happens to a server, users won’t be able to connect to the services.
Regardless of the service you plan to configure on the server, you must make sure to set a static IP address, and on Windows Server 2022, you can perform this task in at least two ways through Control Panel and PowerShell.
This guide will teach you the steps to assign a static TCP/IP address on Windows Server 2022, 2019, and 2016.
- Configure static IP address on Windows Server from Control Panel
- Configure static IP address on Windows Server from PowerShell
Configure static IP address on Windows Server from Control Panel
To assign a static IP on Windows Server 2022, use these steps:
-
Open Control Panel on Windows Server.
-
Click on Network and Internet.
-
Click on Network and Sharing Center.
-
Click the Change adapter settings option on the left navigation pane.

-
Right-click the network adapter and select the Properties option.

-
Select the “Internet Protocol Version 4 (TCP/IPv4)” option.

-
Click the Properties button.
-
Select the “Use the following IP address” option.
-
Assign the static IP address – for example, 10.1.4.120.

-
Specify a Subnet mask. Typically, on a home network, the subnet mask is 255.255.255.0.
-
Specify a Default gateway. (Usually, your router’s IP address. For example, 10.1.4.1.)
-
Under the “Use the following DNS server addresses set Preferred DNS server” section, set the Preferred DNS server address, usually your router’s IP address or server IP address providing DNS resolutions (for example, 10.1.4.1).
-
(Optional) Specify an Alternative DNS server, which the computer will use if it cannot reach the preferred DNS server.
-
Click the OK button.
-
Click the Close button again.
Once you complete the steps, you can open your web browser and load a website to see if the configuration works.
Configure static IP address on Windows Server from PowerShell
To set a static IP address with PowerShell on Windows Server 2022, use these steps:
-
Open Start.
-
Search for PowerShell, right-click the top result, and select the Run as administrator option.
-
Type the following command to view the current configuration and press Enter:
Get-NetIPConfiguration

-
Confirm the “InterfaceIndex,” “IPv4Address,” “IPv4DefaultGateway,” and “DNSServer.”
-
Type the following command to set a static IP address on Windows Server 2022 and press Enter:
New-NetIPAddress -InterfaceIndex 14 -IPAddress 10.1.4.119 -PrefixLength 24 -DefaultGateway 10.1.4.1
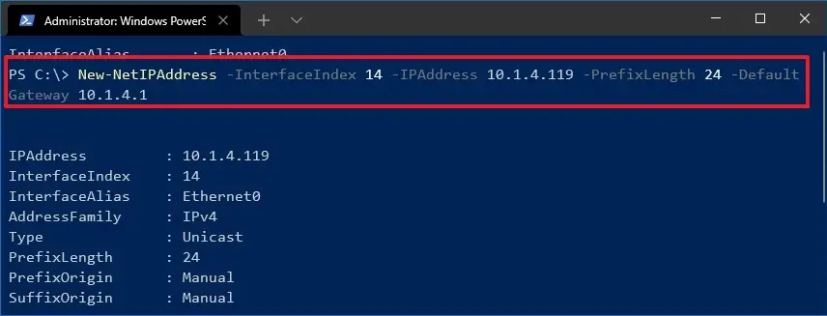
In the command, replace the “InterfaceIndex” number with the corresponding number of your adapter. Change “IPAddress” with the static IP address you want to assign to your device. Replace “PrefixLength” (subnet mask) with the correct bit number if necessary. Usually, the setting is “24” to represent “255.255.255.0.” Also, replace the “DefaultGateway” option with the default gateway address (usually the router) of the network.
-
Type the following command to set the DNS server IP address and press Enter:
Set-DnsClientServerAddress -InterfaceIndex 14 -ServerAddresses 10.1.4.1

-
(Optional) Type the following command to set a secondary DNS server address and press Enter:
Set-DnsClientServerAddress -InterfaceIndex 14 -ServerAddresses 10.1.4.1, 8.8.8.8
In the command, change the “InterfaceIndex” number with your network adapter number and “ServerAddresses” with the DNS IP address.
Once you complete the steps, the PowerShell command will apply the static network to the server.
FAQ
Can I set a static IP configuration from the Settings app?
Yes, you can use the Settings app to configure a static configuration. However, it’s worth noting that the Settings app also provides an interface to configure a static network configuration. However, it’s not recommended to use this method, as you may encounter problems, such as “Can’t save IP settings. Check one or more settings and try again” and others. One of the reasons is that the “Subnet mask” has to represent with bit number, not the full address. For example, “24” instead of “255.255.255.0.” As a result,
Why Windows Server static IP address isn’t working?
The static IP address is not working on Windows Server, because you are using the Settings app to apply the configuration. The easiest way to assign a static TCP/IP address is using Control Panel.
Do these instructions only apply to Windows Server 2022?
No, you can use these instructions to configure a static IP address on Windows Server 2022, 2019, 2016, 2012, 2012 R2, and even older versions.
What TCP/IP address to use for a static configuration?
Always assign a TCP/IP address in the network range and outside of the DHCP server scope to allow proper connectivity and avoid configuration conflicts with other devices in the network.